WISE controller support Email messages sending function. This function allows sending pre-input Email message(s) to pre-set Email receiver(s) under certain conditions. The I/O channel information can be sent via Email in real time; the system status will be reported immediately.
Please note: WISE-71xx, 72xx, 75xx, 790x and 580x Email sending function can only work with the SMTP Email server that uses port 25 and must be without SSL cryptographic protocols. A self-hosted SMTP server is recommended for Email sending function. WISE-52xx/WISE-224x supports to send mails to the SMTP servers that requires SSL or TLS authentication, like Gmail or Yahoo mail.
Email Setting
- WISE-71xx, 72xx, 75xx, 790x
- WISE-580x
- WISE-284x, 52xx, 224x
The Email setting page is shown as below:
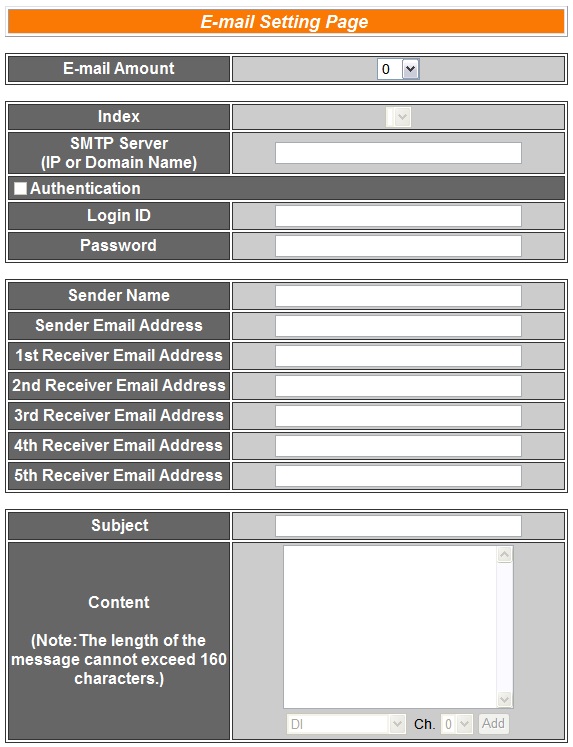
Follow the following steps:
Specify the numbers of email messages you want to set up from the dropdown list of the “E-mail Amount” field.
Specify the email group number from the dropdown list of the “Index” field.
Enter the IP or the domain name of the SMTP server in the “SMTP Server” field.
If SMTP server requires account and password validation, please select the Authentication Checkbox, and continue steps 5 ~ 6 to login into the SMTP server. If SMTP server don’t need account and password validation, uncheck the Authentication Checkbox and skip steps 5 ~ 6, go directly to step 7.
Enter the SMTP server login ID in the “Login ID” field.
Enter the SMTP server password in the “Password” field.
Enter the sender’s name in the “Sender Name” field.
Enter the sender’s email address in the “Sender Email Address” field.
Enter the receiver’s email address in the “1st ~5th Receiver Email address” field. Please note: you can input up to 5 receivers, at least one email address has to be entered. Please enter the email address in sequence to avoid possible error.
Enter the email subject in the “Subject” field.
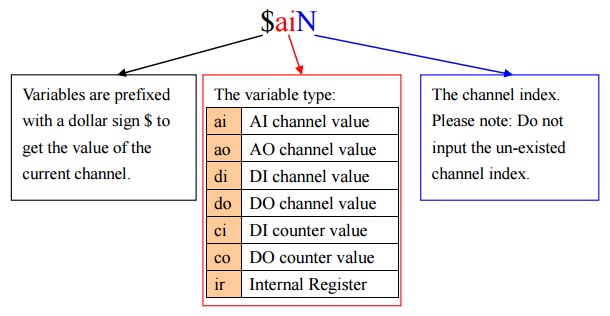
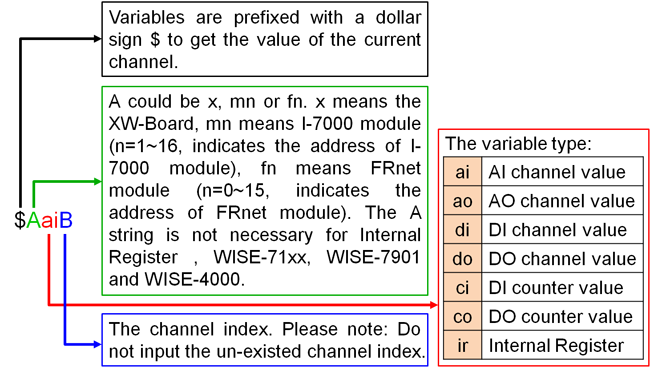
Enter the content in the “Content” field. The length of the content cannot exceed 160 characters. In addition, Email provides an encoded string that allow user to add current channel value into Email content. The syntax is shown as below:
Repeat steps 2 ~ 11. After all email groups settings are completed, click “Save” button to save the changes.
The user can also add channel value encoded string into Email content from the I/O channel selection interface.
The Email setting page is shown as below:
Follow the following steps:
Specify the numbers of email messages you want to set up from the dropdown list of the “E-mail Amount” field.
Specify the email group number from the dropdown list of the “Index” field.
Enter the IP or the domain name of the SMTP server in the “SMTP Server” field.
If SMTP server requires account and password validation, please select the Authentication Checkbox, and continue steps v~vi to login into the SMTP server. If SMTP server don’t need account and password validation, uncheck the Authentication Checkbox and skip steps 5 ~ 6, go directly to step 7.
Enter the SMTP server login ID in the “Login ID” field.
Enter the SMTP server password in the “Password” field.
Enter the sender’s name in the “Sender Name” field.
Enter the sender’s email address in the “Sender Email Address” field.
Enter the receiver’s email address in the “1st ~5th Receiver Email address” field. Please note: you can input up to 5 receivers, at least one email address has to be entered. Please enter the email address in sequence to avoid possible error.
Enter the email subject in the “Subject” field.
Enter the content in the “Content” field. The length of the content cannot exceed 160 characters. In addition, Email provides an encoded string that allow user to add current channel value into Email content. The syntax is shown as below:
Repeat steps 2 ~ 11. After all email groups settings are completed, click “Save” button to save the changes.
The user can also add channel value encoded string into Email content from the I/O channel selection interface.
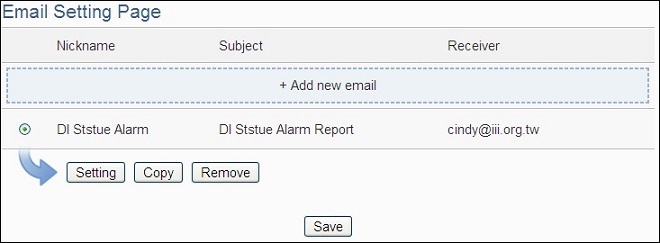
The Email setting page is shown as below:
The settings steps are as below:
Click on “Add new email” to add a new email setting.
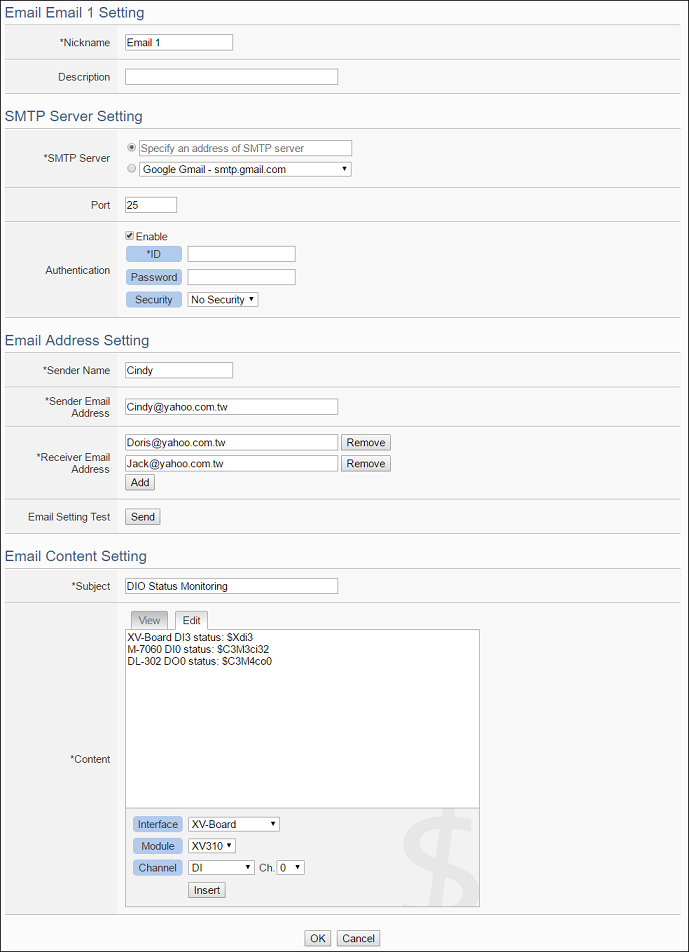
After clicking the “Add new email”, a setting page will appear, shown as below:
Input a name in the “Nickname” field and you could also input the description of this email in the “Description” field.
In the “SMTP Server” field, enter the IP or the domain name of the SMTP server; or select the SMTP server from the dropdown list. In the dropdown list, WISE-52xx/WISE-224x provide four public SMTP servers for selection as below:
- Google Gmail
- Yahoo Mail
- Microsoft Outlook / Hotmail
- AOL Mail
Input the Port number, the default port number is set as 25.
If the SMTP server requires account and password validation, please select the “Enable” checkbox in the “Authentication” field, and continue steps 7 ~ 9 to login into the SMTP server. If the SMTP server doesn’t need account and password validation, uncheck the “Enable” checkbox and go directly to step 10.
Enter the SMTP server login ID in the “ID” field.
Enter the SMTP server password in the “Password” field.
In the “Security” field, select the security setting to be “No Security”, “TLS”, or “SSL” from the dropdown list.
After complete SMTP server setting, continue to input Email address setting. In the “Sender Name” field, input the name of the sender.
Enter the sender’s email address in the “Sender Email Address” field.
In the “Receiver Email Address” section, click on “Add” to add the receiver’s email address. At least one email address has to be entered.
To verify whether your email setting is correct to send the Email, click “Send” in the “Email Setting Test” section, then WISE-52xx/WISE-224x will send a test Email to the receiver’s email address.
After complete Email Address setting, continue to input Email Content setting. Enter the email subject in the “Subject” field.
Enter the content in the “Content” section. In addition, it provides encoded strings for users to add current I/O channel value or Internal Register value into the Email content. To make it easy to add the encoded string.
Click on “OK” to confirm the setting and return to the Email list page.
Repeat steps 1 ~ 16 to complete settings of all Emails, After you finish all the Email settings, click “Save” button to save the settings.
After select SMTP server from the dropdown list, WISE will automatically complete the “Port Number” and “Security” setting related to the SMTP server you select.
Email Rule Setting
Email Action:
Users can send Email in the Action statement.
| Action | Description | Execution Type | |
| Email index N | Send | Send Email | One Time |
Email Application Example
| Scenario | Example Document | ||||||
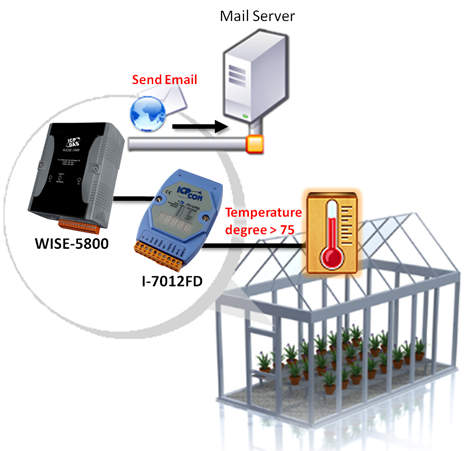
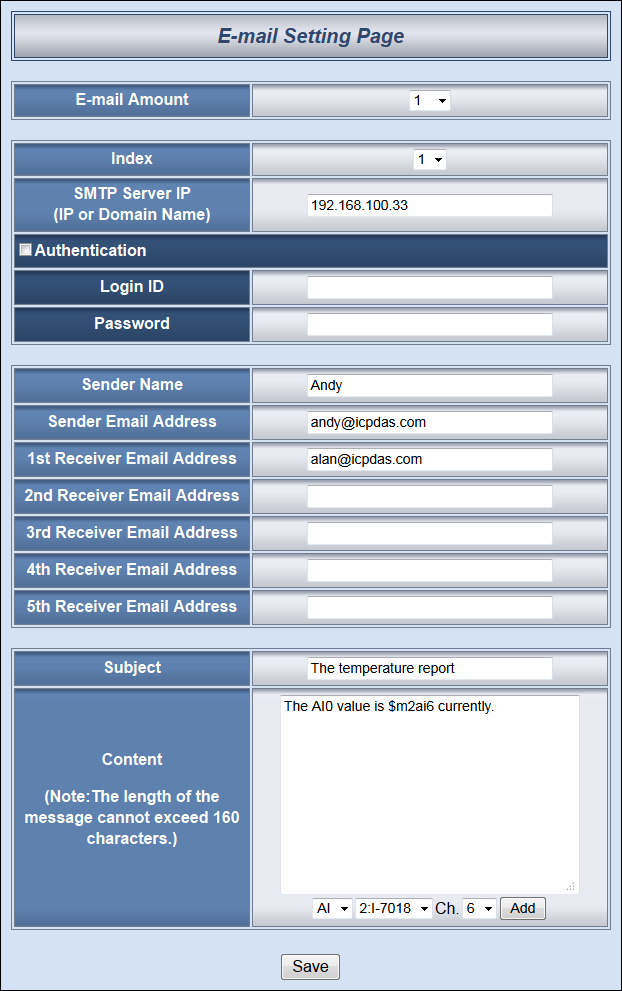
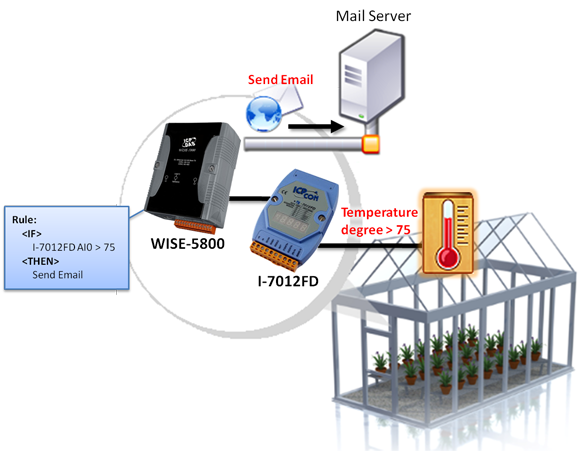
Assume a greenhouse is equipped with a WISE controller for environment monitoring. The temperature sensor is connected to the AI Channel on the WISE controller, when the greenhouse temperature reached 75 degree, WISE will immediately send Email to inform related personnel for emergency response. |
|
||||||
| Graphic Illustration | |||||||
 |
|||||||
