MQTT Introduction
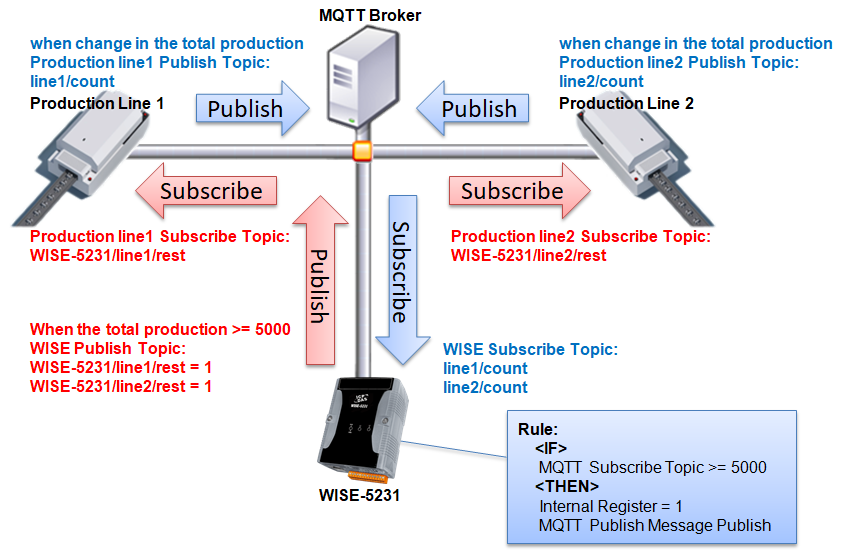
WISE-75xx, WISE-52xx and WISE-224x provide MQTT Client function. WISE-75xx can connect to one MQTT Broker, and WISE-284x / WISE-52xx / WISE-224x can connect with two (Maximum) MQTT Brokers concurrently. In order to enable the MQTT Client function, user has to complete the setting of Publish Topic and its message content with the MQTT Brokers, and also the setting of Subscribe Topics. In addition, WISE-284x / WISE-52xx / WISE-224x supports to connect with the MQTT Broker the requires SSL/TLS encryption, and provides the “Topic Import/Export” function. It will help user to organize the MQTT topics from different MQTT devices in an easy way.
MQTT Setting
- WISE-75xx
- WISE-284x, 52xx, 224x
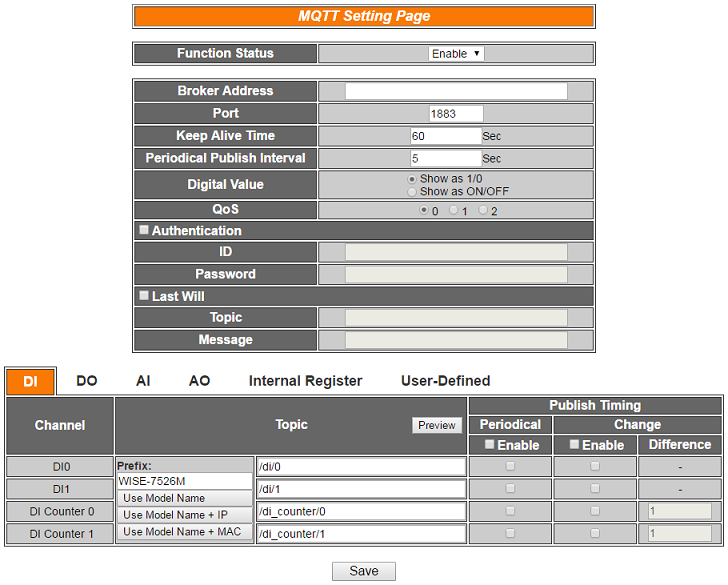
WISE-75xx provides the MQTT Client function. It allows WISE-75xx to publish I/O channel status to the specified Broker, and automatically subscribe the topics to control the output channels and internal registers from MQTT messages. The configuration page for MQTT Setting is shown as below:
Follow the following steps:
-
Select “Enable” in the “Function Status” field to enable the MQTT function.
-
Enter the Broker IP address (or domain name) in the “Address” field.
-
Enter the Broker Port number in the “Port” field.
-
The value in “Keep Alive Time” field defines the maximum time that should pass without communication between the WISE-75xx and the Broker.
-
The value in “Periodical Publish Interval” field defines the time interval which all Publish Topics with the “Periodical Publish” attribute will be sent automatically periodically. If the value of the “Periodical Publish Interval” field is 0, it means to disable the “Periodical Publish” operation. The unit of the value is second.
-
In the “Digital Value” field, users can specify that the message content of digital channel values are published as OFF/ON or 0/1.
-
In the “QoS” field, users can specify the QoS(Quality of Service) for publish and subscription.
-
If the Broker requires account and password validation, please select the “Authentication” checkbox, and enter the login ID and password in the “ID” and “Password” fields to login into the Broker. If the Broker doesn’t need account and password validation, uncheck the “Authentication” checkbox and go directly to next step.
-
Click the “Last Will” checkbox will let the Broker to send the alarm Topic to others MQTT client devices when WISE-75xx is in Network disconnection status with the Broker. After click the “Last Will” checkbox, user has to complete the setting of Last Will Topic and Message content.
-
The table in the lower half area of the MQTT Setting Page is about the Publish Topic setting. Users can edit the topic string and publish timing of all I/O channels and enabled Internal Registers. Users can also select “User-Defined” tag in the table to edit the Publish Topic and its binding message by the free style editing interface. Click “Add Message” to create a new User-Defined topic, and click the “X” button in front of the message to remove it. The user interface is shown as below.
-
Edit the topics of all messages in the “Topic” field. Besides “User-defined” Topic, a Prefix will be added in front of all topics. Users can edit the Prefix at will, or press the buttons “Use Model Name”, “Use Model Name + IP”, and “Use Model Name + MAC” to use the default Prefixes. Press the “Preview” button to check the complete Topics.
-
There are two options as “Periodical” and “Change” in the “Publish Timing” field for the timing to publish topic. If user selects “Enable” in the “Periodical” field, it means the topic will be published at periodic time schedule base on the value in “Periodical Publish Interval” field at Step v. If user selects “Enable” in the “Change” field, it means user has to enter the difference value in the “Difference” field, and the system will automatically publish the topic when the I/O channel value change takes place and it is exceeds the difference value (The Change option is not supported in the “User-Defined” message). WISE-75xx can also publish a MQTT Topic to the Broker when an IF event is triggered.
-
After all MQTT settings are completed, click “Save” button to save the changes.

The MQTT setting page is shown as below:
The settings steps are as below:
-
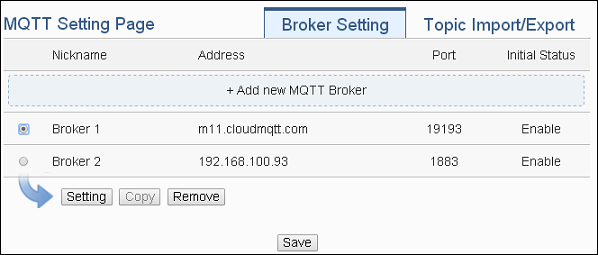
Click the “Broker Setting” tab on the right-top corner of “MQTT Setting Page”.
-
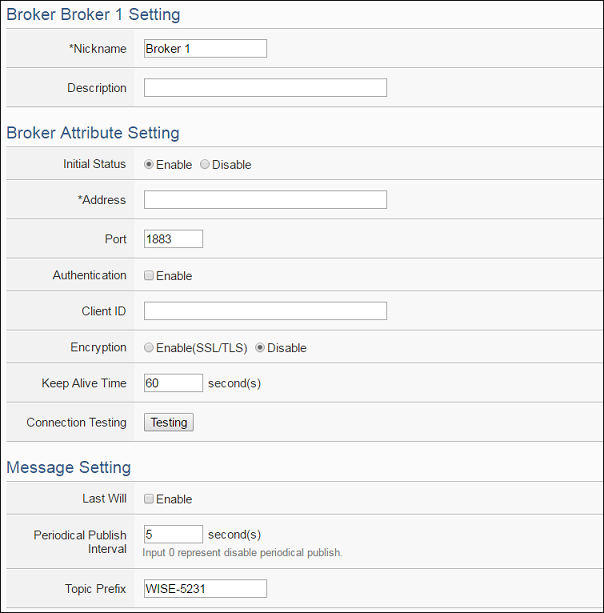
Click on “Add new MQTT Broker” to add the new MQTT Broker. After clicking the “Add new MQTT Broker”, the MQTT Broker Setting Page will appear. The upper half area of the setting page is about the Broker parameters setting. It will be shown as below:
-
In the Broker parameters setting page, you can input the name of the Broker in the “Nickname” field and you could also input the description of this Broker in the “Description” field.
-
Check “Enable” or “Disable” in the “Initial Status” field to enable the initial connection status with the Broker. If the user clicks “Enable”, it means the WISE-284x / WISE-52xx / WISE-224x will start the communication with the Broker after it is powered on.
-
Enter the Broker IP address (or domain name) in the “Address” field.
-
Enter the Broker Port number in the “Port” field.
-
If the Broker requires account and password validation, please select the “Enable” checkbox in the “Authentication” field, and enter the login ID and password in the “ID” and “Password” fields to login into the Broker. If the Broker doesn’t need account and password validation, uncheck the “Enable” checkbox and go directly to next step.
-
Enter the Client ID information in the “Client ID” field. The Client ID is used for Broker to verify if the MQTT Client is allowed to connect to the Broker or not. If the Broker does not require Client ID for the connection, this field can be ignored.
-
If the SSL/TLS encryption mechanism is required for the connection between the Broker and the WISE-284x / WISE-52xx / WISE-224x via MQTT, click the “Enable” checkbox of the “Encryption” field to enable this function.
-
The value in “keep alive Time” field defines the maximum time that should pass without communication between the WISE-284x / WISE-52xx / WISE-224x and the Broker. The WISE-284x / WISE-52xx / WISE-224x will ensure that at least one message travels across the network within each keep alive period. In the absence of a data-related message during the time period, the WISE-284x / WISE-52xx / WISE-224x sends a very small MQTT “ping” message, which the Broker will acknowledge. The keep “alive interval” enables the WISE-284x / WISE-52xx / WISE-224x to detect when the Broker is no longer available without having to wait for the long TCP/IP timeout. The unit of the value is second.
-
To verify whether your Broker setting is correct, click “Testing” in the “Connection Test” section, then WISE-284x / WISE-52xx / WISE-224x will try to connect to the Broker and reply the connection status.
-
Click the “Enable” checkbox in the “Last Will” field to allow the Broker to send the alarm Topic to other MQTT client devices when WISE-284x / WISE-52xx / WISE-224x lost connection to the Broker. After clicking the “Enable” checkbox, the setting of Last Will Topic, Message content and QoS will be brought up.
-
The value in “Periodical Publish Interval” field defines the time interval (in second) to send all Publish Topics with the “Periodical Publish” attribute automatically and periodically. If the value of the “Periodical Publish Interval” field is 0, it means the “Periodical Publish” operation is disabled.
-
The “Topic Prefix” field is for setting up a string as Topic Prefix. The prefix can be used in the Publish Topic or Subscribe Topic to simply the Topic editing. The default string of the “Topic Prefix” will be the model name of the WISE-284x / WISE-52xx / WISE-224x. If there are more than one WISE-284x / WISE-52xx / WISE-224x controllers in a system for MQTT connection, please remember to change the “Topic Prefix” setting to distinguish the Publish Topic/Subscribe Topic setting of each WISE-284x / WISE-52xx / WISE-224x controllers.
-
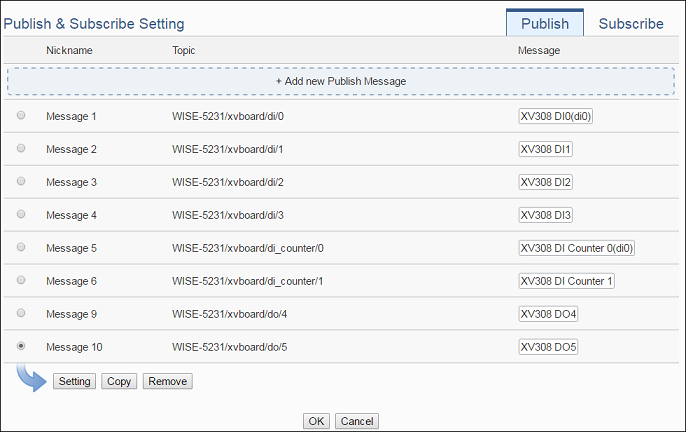
The lower half area of the MQTT Broker Setting Page is for the Publish Message and Subscribe Topic setting. User can click the “Publish” tab or “Subscribe” tab on the right-top corner of “Publish & Subscribe Setting” to edit the Publish Message and Subscribe Topic. The Interface will be shown as below:
-
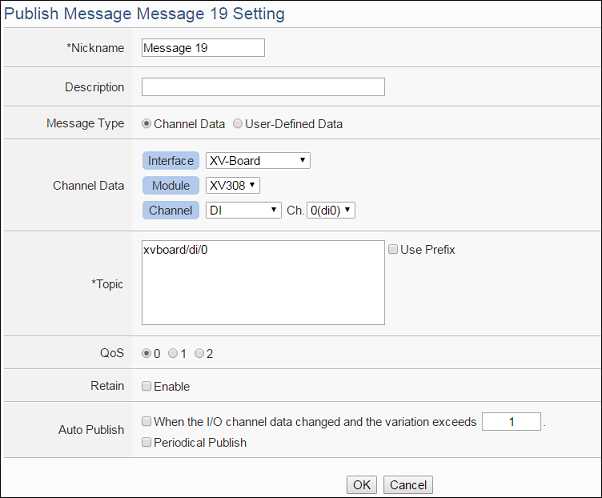
Click the “Publish” tab to edit the Publish Message. Click on “Add new Publish Message” to add a new Publish Message. The Interface will be shown as below:
-
Input a name in the “Nickname” field and you could also input the description of this Publish Message in the “Description” field.
-
In the “Message Type” field, select the “Channel Data” to prepare a Publish Message with the I/O channel value. Based on the “Channel Data” interface, user can select a specific I/O channel value or “All” I/O channel value for the Publish Message. If the user selects a specific I/O channel, it means the I/O channel value will be bound with the Publish Message. If the user select “All” I/O channels, it mean all I/O channel values will be added into the Publish Message List. After completing the “Channel Data” setting, the system will automatically generate the default Topic content in the “Topic” field. User can modify the content of the “Topic” field if require. If the “Use Prefix” checkbox is enabled, the string in the “Topic Prefix” field will be used as the prefix of the Publish Topic.
-
In the “QoS” field, user can select 0, 1, 2 for the QoS(Quality of Service) setting for the Publish Message.
-
In the “Retain” field, user can click the “Enable” checkbox to keep the Publish Message in the Broker.
-
The timing to publish message is set in the “Auto Publish” field, there are two options: “When the I/O channel data changed and the variation exceeds xxx” and “Periodical Publish”. If the “When the I/O channel data changed and the variation exceeds xxx” is selected, the system will automatically publish the topic when the I/O channel value is changed and exceeds the evaluation value (This option only support “Channel Data” setting in “Message Type”). If user selects “Periodical Publish”, it mean the topic will be published at periodic time schedule base on the value in “Periodical Publish Interval” field.
-
After completing all settings of Publish Topic, please click “OK” button to add the Publish Topic to the Publish Message List.
-
Click the “Subscribe” tab to edit the Subscribe Topic. The user interface is shown as below.
-
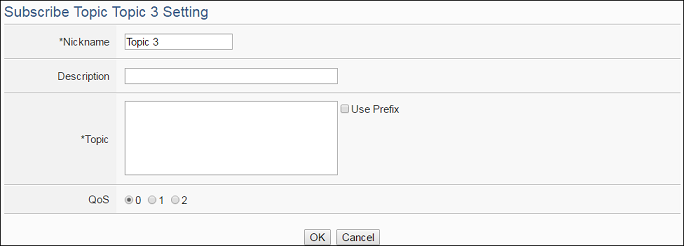
Click on “Add new Subscribe Topic” to add a new Subscribe Topic. The Interface will be shown as below:
-
Input a name of the Subscribe Topic in the “Nickname” field, and you could also input the description of this Subscribe Topic in the “Description” field. In the “Topic” field, user can input the content of the Subscribe Topic. After completing all settings of Subscribe Topic, please click “Add” button to add the Subscribe Topic to the Subscribe Topic List.
-
After completing all settings of the Broker, please click “OK” button to return to add the MQTT Setting Page. And then click “Save” button to save all MQTT Broker settings.


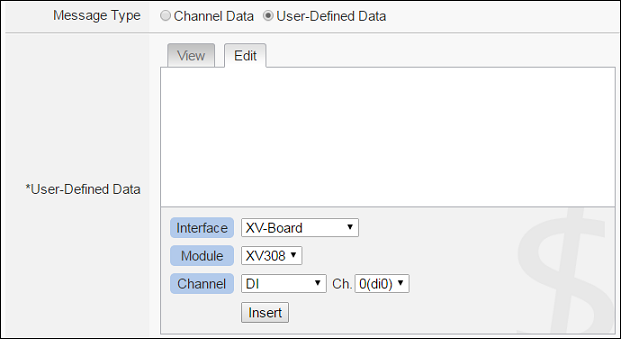
The user can select “User-Defined Data” in “Message Type” field to edit the Publish Topic and its binding message on the free style editing interface. The user interface is shown as below.

The value of the Subscribe Topic can be used in the IF-THEN-ELSE logic evaluation, and also be recorded in the MQTT Data Logger. In addition, all Internal Registers and the I/O modules connected to WISE-284x / WISE-52xx / WISE-224x have their own default definition of Subscribe Topic. It allows user to change the value of the Internal Register and the value of the output channel of I/O module by MQTT protocol.
MQTT Rule Setting
-
Broker Connection Status Condtion:
- Broker Connection Status only for WISE-284x / WISE-52xx / WISE-224x.
-
Subscribe Topic Condtion:
- Subscribe Topic only for WISE-284x / WISE-52xx / WISE-224x.
-
Broker Function Status Action:
- Broker Function Status only for WISE-284x / WISE-52xx / WISE-224x.
-
Publish Message Action:
- Publish Message only for WISE-284x / WISE-52xx / WISE-224x.
-
Reset Topic Action:
- Reset Topic only for WISE-284x / WISE-52xx / WISE-224x.
Identify the connection status to be “Offline” or “Online”. If the connection status of the Broker match the evaluation criteria, the Action will be executed.
| Broker Connection Status | Operator | Description | Condition Statements |
| Broker Connection Status of index N | Offine | Identify if the state of Broker Connection is Offine | continue to be TRUE when the status matches the criteria |
| Online | Identify if the state of Broker Connection is Online |
Identify the value of Subscribe Topic to be equal to, greater than, less than, equal to or greater than, equal to or less than the “Variable”, if the result matches the evaluation criteria, the Action will be executed.
| Subscribe Topic | Operator | Variable | Description | Condition Statements |
| Subscribe Topic Message of index N | = > < ≥ ≤ |
User-Defined Value | Using a user-defined value to compare with the subscribe topic message of index N. | continue to be TRUE when the status matches the criteria |
| Internal Register | Using the internal register value to compare with the Msubscribe topic message of index N. | |||
| AI Channel Value | Using AI channel values of module to compare with the subscribe topic message of index N. | |||
| AO Channel Value | Using AO channel values of module to compare with the subscribe topic message of index N. | |||
| DI Channel Counter Value | Using DI channel counter values of module to compare with the subscribe topic message of index N. | |||
| DO Channel Counter Value | Using DO channel counter values of module to compare with the subscribe topic message of index N. | |||
| Input Register Value | Using input register values of module to compare with the subscribe topic message of index N. | |||
| Holding Register Value | Using holding register values of module to compare with the subscribe topic message of index N. | |||
| Subscribe Topic Message Value | Using subscribe topic message value to compare with the subscribe topic message of index N. | |||
| Amazon Web Services Subscribe Message Value | Using Amazon Web Services subscribe message value to compare with the subscribe topic message of index N. | |||
| Microsoft Azure Subscribe Message Value | Using Microsoft Azure subscribe message value to compare with the subscribe topic message of index N. | |||
| IBM Bluemix Subscribe Message Value | Using IBM Bluemix subscribe message value to compare with the subscribe topic message of index N. |
Change the Broker Function status to specified status. The status can be set as “Enable” or “Disable”.
| Broker Function Status | Action | Description | Execution Type |
| Broker Function Status of index N | Enable | Change the Broker Function status to be Enable | One Time |
| Disable | Change the Broker Function status to be Disable |
Users can publish a MQTT Topic to the Broker when executing a Action statement.
| Publish Message | Action | Description | Execution Type |
| Publish Topic Message of index N | Publish | Publish topic message | One Time |
Users can reset the value of Subscribe Topic when executing a Action statement.
| Reset Topic | Action | Description | Execution Type |
| Subscribe Topic Message of index N | Reset | Reset the value of subscribe topic message | One Time |

