WISE-75xx, WISE-790x ,WISE-580x, WISE-52xx and WISE-224x controllers provide Schedules to setup prescheduled routine tasks. With Calendar user interface provided, Schedule setting can be more efficient and flexible for the users.

Schedule Setting
- WISE-75xx, 790x
- WISE-580x
- WISE-284x, 52xx, 224x
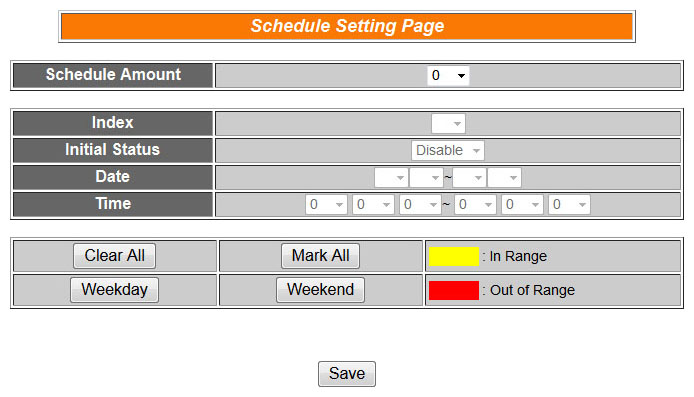
The schedule setting page is shown as below:
Follow the following steps:
Select the total number of schedule you are going to use from the dropdown list of the “Schedule Amount” field.
Specify the schedule you want to set up by selecting its index number from the dropdown list of the “Index” field.
Specify the initial status of each schedule from the dropdown list of the “Initial Status” field. “Start” indicates the schedule will be activated as soon as the hardware device is power up. “Stop” indicates the schedule will remain inactive when the hardware device is power up, it will not be activated until being triggered under certain conditions.
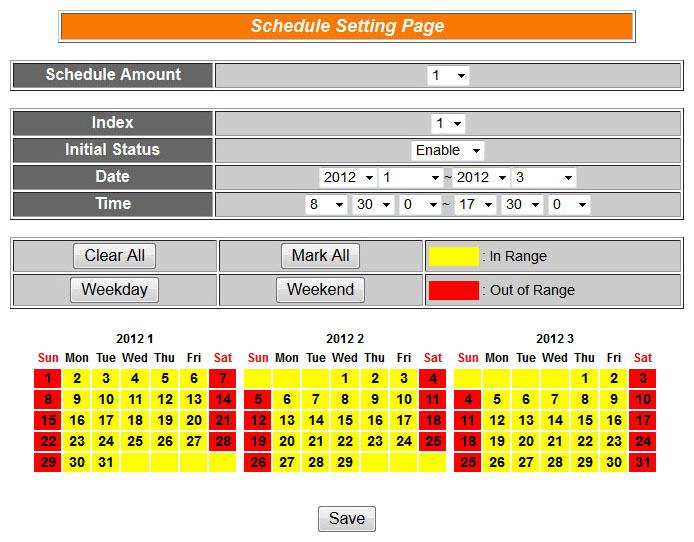
Set up the Year and Month for this Schedule execution duration. After you specify the Year and Month in the Date section, the calendars corresponding to the Year and Month you specified will appear as shown below:
Input the schedule “In Range” time. If you specify an end time that is earlier than the start time, such as 20:00:00 ~ 06:00:00, it indicates the end time will be set one day after the start date.
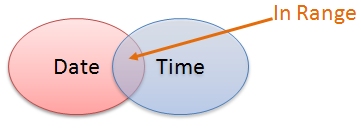
On the calendars, click to toggle highlight on the dates you’d like to execute or not execute the operations for this Schedule. If the date shows a yellow background, it indicates the date is “In Range”, that is, that date falls into the range that will execute the operations. On the contrary, if the date shows a red background, it indicates that date is “Out of Range”, that is, that date falls out of the range and will not execute the operations. By default, all dates will be “In Range”, that is, during the date range you select, the operation will be executed every day. Clear All button is used to reset all dates to be “In Range”; whereas Mark All button is for marking all dates to be “Out of Range”. The Weekday button is for you to select all Mondays to Fridays to be “In Range”, and Saturdays and Sundays to be “Out of Range”, that is, the operations will be executed during weekdays only. On the contrary, the Weekend button is for you to set all Saturdays and Sundays to be “In Range”, and all Mondays to Fridays to be “Out of Range”, that is, the operations will be executed during weekends only.
Repeat steps 2 ~ 6. After all schedule settings are completed, click “Save” button to save the changes.
The schedule setting page is shown as below:
Follow the following steps:
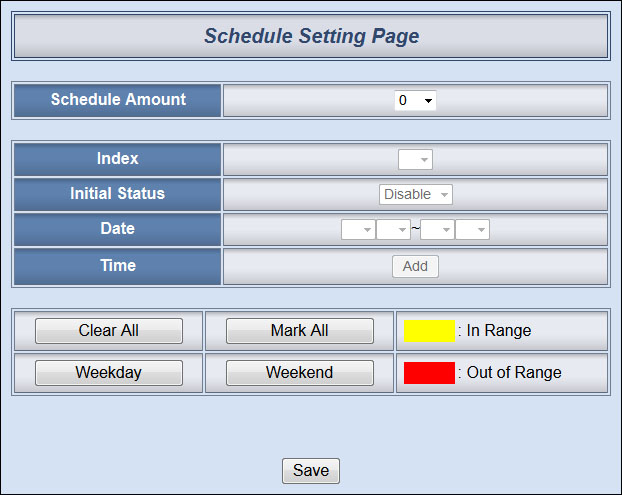
Select the total number of schedule you are going to use from the dropdown list of the “Schedule Amount” field.
Specify the schedule you want to set up by selecting its index number from the dropdown list of the “Index” field.
Specify the initial status of each schedule from the dropdown list of the “Initial Status” field. “Start” indicates the schedule will be activated as soon as the hardware device is power up. “Stop” indicates the schedule will remain inactive when the hardware device is power up, it will not be activated until being triggered under certain conditions.
Set up the Year and Month for this Schedule execution duration. After you specify the Year and Month in the Date section, the calendars corresponding to the Year and Month you specified will appear as shown below:
In the Time field, input the schedule “In Range” time. You can input up to 12 time zones in a specific date. Select the start time and the end time from the dropdown list. Click “Add” button to add a new time zone. Please note: the time zones you specified can’t be overlapped. If you specify an end time that is earlier than the start time, such as 20:00:00 ~ 06:00:00, it indicates the end time will be set one day after the start date.
On the calendars, click to toggle highlight on the dates you’d like to execute or not execute the operations for this Schedule. If the date shows a yellow background, it indicates the date is “In Range”, that is, that date falls into the range that will execute the operations. On the contrary, if the date shows a red background, it indicates that date is “Out of Range”, that is, that date falls out of the range and will not execute the operations. By default, all dates will be “In Range”, that is, during the date range you select, the operation will be executed every day. Clear All button is used to reset all dates to be “In Range”; whereas Mark All button is for marking all dates to be “Out of Range”. The Weekday button is for you to select all Mondays to Fridays to be “In Range”, and Saturdays and Sundays to be “Out of Range”, that is, the operations will be executed during weekdays only. On the contrary, the Weekend button is for you to set all Saturdays and Sundays to be “In Range”, and all Mondays to Fridays to be “Out of Range”, that is, the operations will be executed during weekends only.
Repeat steps 2 ~ 6. After all schedule settings are completed, click “Save” button to save the changes.

The schedule setting page is shown as below:
Follow the following steps:
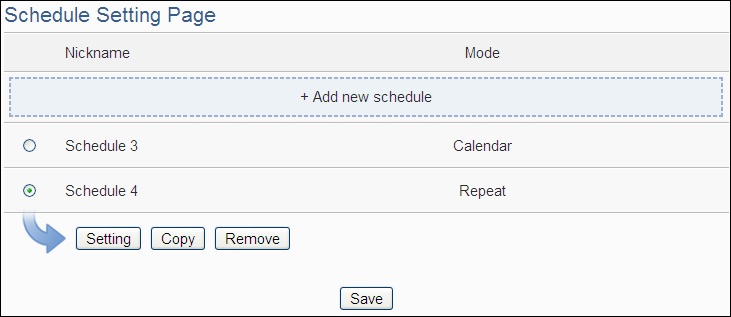
Click on “Add new schedule” to add a new schedule.
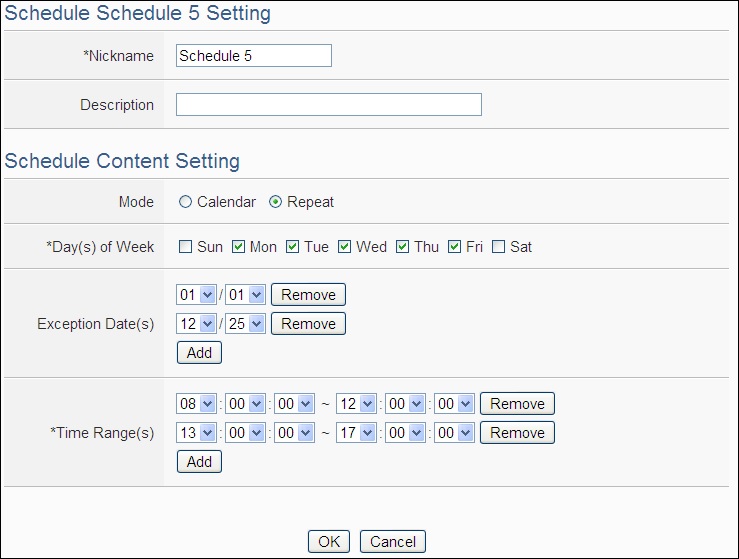
After clicking the “Add new schedule”, a setting page will appear. Input a name in the “Nickname” field and you could also input the description of this schedule in the “Description” field.
Select Mode to be “Calendar” or “Repeat”.
- Calendar:
- In the “Date” field, select the “Starting Month” and “Duration” from the dropdown list. The maximum duration can be set is 120 months. After you specify the Year and Month in the Date section, the calendars corresponding to the Year and Month you specified will appear.
- In the “Time Range(s)” section, click “Add” to add new Time Range of this schedule. Select the start time and the end time from the dropdown list. Each Schedule is required to set at least one Time Range; click on “Add” to add more Time Range. Please note: the time zones you specified can’t be overlapped. If you specify an end time that is earlier than the start time, such as 20:00:00 ~ 06:00:00, it indicates the end time will be set one day after the start date. Click “Remove” to remove a pre-set Time Range.
- On the calendars, click to toggle highlight on the dates you’d like to execute or not execute the operations for this Schedule. If the date shows a light blue background, it indicates the date is “In Range” of the schedule, that is, that date falls into the range that will execute the operations. On the contrary, if the date shows a light grey background, it indicates that date is “Out of Range” of the schedule, that is, that date falls out of the range and will not execute the operations. By default, all dates will be “In Range”, that is, during the date range you select, the operation will be executed every day. “Select All” button is used to set all dates to be “In Range”; whereas “Unselect All” button is for marking all dates to be “Out of Range”. The Weekday button is for you to select all Mondays to Fridays to be “In Range”, and Saturdays and Sundays to be “Out of Range”, that is, the operations will be executed during weekdays only. On the contrary, the Weekend button is for you to set all Saturdays and Sundays to be “In Range”, and all Mondays to Fridays to be “Out of Range”, that is, the operations will be executed during weekends only.
- Repeat:
- In the “Day(s) of week” section, click on the day(s) in a week that is going to execute the schedule.
- In the “Exception Date(s)” selection, click on “Add” to add the date(s) that is/are not in the schedule. Click “Remove” to remove a pre-set Exception Date.
- In the “Time Range(s)” section, click “Add” to add new Time Range of this schedule. Select the start time and the end time from the dropdown list. Each Schedule is required to set at least one Time Range; click on “Add” to add more Time Range. Please note: the time zones you specified can’t be overlapped. If you specify an end time that is earlier than the start time, such as 20:00:00 ~ 06:00:00, it indicates the end time will be set one day after the start date. Click “Remove” to remove a pre-set Time Range.
Click on “OK” to confirm the setting and leave the setting page.
Repeat steps 1 ~ 4 to complete settings of all Schedules, click “Save” button to save the changes.

Schedule Rule Setting
The status of Schedule function can be “In Range” or “Out of Range”, they can be included in the IF Condition statements. If current date and time fall in the range of the Schedule, the Schedule status will be “ In Range”, if not, the status will be “Out of Range”. The Action of Schedule can be “Enable” or “Disable”, allows to enable or disable Schedule function. Please note, if the Schedule is disabled, the status will be “Out of Range”.
Schedule Condition:
Schedule Action:
Schedule status can be included in the IF Condition statements.
| Schedule | Status | Description | Condition Statements |
| Schedule Status of index N | Out of Range | Current time does not fall in the range of the Schedule | continue to be TRUE when the status matches the criteria |
| In Range | Current time falls in the range of the Schedule |
Users can change the Schedule status in the Action statement.
| Schedule | Action | Description | Execution Type |
| Schedule index N | Enable | Enable the Schedule | One Time |
| Disable | Disable the Schedule | One Time |
Schedule Application Example
| Scenario | Example Document | ||||
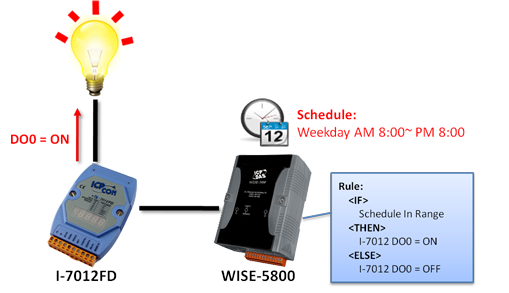
By WISE Schedule function, the user can easily deploy lighting management system for a workplace to achieve the purpose of energy saving. In this scenario, a light is connected to DO channel 0 on an I-7012FD module that is connected to a WISE-5800 Controller, the light will be automatically turned on during working hours (8:00 to 20:00) on each work day(Monday to Friday) and will be turned off during the other sessions. |
|
||||
| Graphic Illustration | |||||
 |
|||||
